Phone: (530) 417-5447
Features
The following are standard features I implement on all instruments. You can of course request something different, but here I discuss what I strongly suggest, and why.
- Asymmetric Neck Contouring
- Minimal Heel
- Unhindered Upper Fret Access
- Evo hypoallergenic or Stainless Steel Frets
- Scarf Join and/or Volute
- Zero-fret
- Fretboards
Asymmetric Neck Contouring
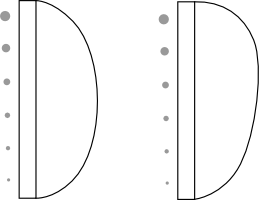
Typical necks have symmetric cross sections, like in the left picture. If you look at the angle at which your fingers press onto the fretboard though, they are usually not straight on (i.e. not perpendicular to the fretboard). This can lead to accidentally muting strings adjacent to the one you are fretting. Since your thumb is your hand's reference to the neck, asymmetric necks like in the right picture cause your hand to rotate inward such that your fingers press on the strings more perpendicularly, which reduces accidentally muting.
Minimal Heel
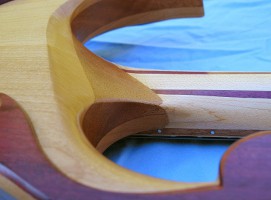
When playing on the highest frets it's really nice to not have a bulky heel in the way. To make playing those frets easy I try to make heels as minimal as I can. On the standard model, however, I leave the heel there, simply because it's easier to manufacture that way and it keeps cost down a little (you can of course add it when ordering). Plus, I feel it doesn't adversely affect virtually all playing scenarios, because since it has a 26-fret neck, the heel still ends really high up the neck, as much as a well-sculpted 24-fret guitar. It doesn't look quite as nice, but you can still reach all the frets very easily.
Unhindered Upper Fret Access
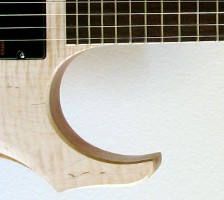
The other factor in fret access is how deep the lower cutout goes into the body. It's nice to have it go at least as far as the last fret, but I think it's even better to have it go a bit farther, especially if you want to play the last fret with a finger other than your pinky. This is because with more space in the cutout you have some room for a couple of fingers to fit, so you can play the last fret with your ring or middle finger too without having to awkwardly reach. In the picture of the standard model you can see this. This is also a 26-fret neck, so the usual 24th fret is extremely easy to get to.
EVO hypoallergenic or Stainless Steel Frets
As standard I use a hypoallergenic fret wire made by Jescar called EVO fret wire. I make it my standard partly because I'm allergic to nickel and regular frets really piss my skin off, and also because it's just a really nice material, and made by a company that's been working with frets and other alloy applications for a long time and that really knows its stuff. It's harder and longer lasting than normal fret wire, and has a gold color.
They also make stainless steel fret wire, which is harder and longer lasting still. Although it doesn't seem to bother me and I will install them for a $50 charge (they are difficult to work and wear tools out faster), I don't make it standard because I seem to be sensitizing to nickel as time goes on and I try not to be around it if possible.
I don't ever use regular fret material because it just ruins my fingers. :( But that's ok because there isn't really any benefit to regular frets over the alternatives anyway. If you're deciding between EVO and stainless, choose EVO for sure if you suspect you have an allergy, but beyond that I'd honestly make the decision based on color preference and whether or not you mind a $50 upcharge, since the two materials are pretty similar in wear characteristics.
Scarf Join and/or Volute
Sometime an instrument with a headstock falls, and sometimes the headstock snaps off. That sucks a lot. This happens mainly with headstocks that are the same piece of wood as the neck. The grain of the wood goes in the same direction as the neck and it's very stiff that way, but since the headstock angles back, the ends of the grain become exposed as in the picture. The bonds between the grains bend and separate comparatively easily, so the headstock is prone to breaking off, especially since it's already got all the string tension pulling it.
Two ways to help prevent this are the scarf joint and the volute. A headstock joined to the neck with a scarf joint is simply a headstock glued to the neck like in the photo. But now the grain direction is oriented the same direction as the headstock so there's no grain run-out.
A volute is simply an extra bulk of wood at the spot where headstocks usually break. It strengthens it well. Instruments I make can have either a scarf joined headstock, a volute, or both (although it's not necessary to have both).

Zero-fret
This fret takes the place of the nut for height reasons. In many guitars the string height at the nut is higher than the rest of the frets, which makes sense if you want a sure way to keep open notes from buzzing, but it can cause inconsistent playing and intonation. With a high nut you have to press the string down comparatively far going from an open note to, say, the 1st fret, whereas if you're already fretting a note and play the next fret, you only press down a tiny amount. Intonation is affected because pressing the string down to a fret adds tension (raises the pitch), so if the nut is high more tension will be added, and very dramatically at the first frets (kind of like how it's harder to bend strings at the first few frets than at the 12th).
Nuts can be meticulously made to be the height of the frets, but since a zero-fret is leveled along with all the others in the building process, its height is consistent. A nut is still situated right behind the zero-fret, but that's just to keep string spacing. Another supposed benefit of a zero-fret if that open notes will have a timbre, or �tone� more comparable to fretted notes since the string always vibrates through the same type of material, whereas a nut is some other different sounding material. I hope to test this some time.

Fretboards
I recommend either flat fretboards or a particular type of curved board that is superior to fretboards that have a constant radius (like 15" or something).
To start, if sustain is something you want to have in full I recommend a perfectly flat fretboard, especially for guitars. Although curved fretboards can be more comfortable for chords, they usually hasten a note's decay, even when simply fretting a note but particularly when doing a string bend. Some call this "fretting out."
How does this happen, and what can we do to improve it?
Short Version
Imagine a typical fretboard that has a constant radius, like 12" or 15" or something. If you stretch a string directly down the length of the fretboard, all is hunky dory. However, when you bend that string across the board (or looking at resting outer strings which taper and stretch left to right a little), the string travels over what is now a sort of hump in the fretboard (basically a more minor version of how the fretboard is radiused, or humped, from side to side). That hump encroaches on the vibrating arc of the string, which shortens sustain as the string slightly hits various frets.
The best way to get this hump out of the vibrating strings' area is to well, remove the hump. A flat fretboard enables superior sustain for any amount of string taper or bending; the vibrating arc is as unhindered when doing extreme bends as it is when you're just fretting normally (no hump to get in the way). This also means that fretboards with smaller radii (like 9" or 10") will have more sustain issues than flatter boards because the hump is dramatic.
If you find that a curved board is worth the comfort, then I offer the best curvature geometry within that category also, which mitigates these sustain problems. It's a particular type of compound radius fretboard which is basically a fretboard that is a section of a cone rather than a cylinder, (normal boards with a single radius like 15" are cylindrical sections). In addition, the change in curvature from one end of the fretboard to the other is determined by how much the neck tapers (strings being closer together at the nut and farther apart at the bridge). That last part is essential. You can't just choose one radius for the first fret and another for the last; you can choose one, and the rest follows based off the degree of neck taper. This type of curved board I offer eliminates fretting out when playing open or fretted notes, and mitigates it as much as possible when bending a string.
Long Version (With Pictures)
I'll first describe the ideal fret-to-string relationship, and then explain how common fretboards are shaped, why they aren't ideal, and what to do to fix them. The two key factors to keep in mind throughout are string taper (strings being closer together at the nut and spaced wider at the bridge) and fingerboard curvature.
Here is the concept for what is ideal. Let's pretend we're looking at a fretboard from the side (from the side that has the side-dot markers). If you look at one string and the frets underneath it (picture 1), obviously the string goes in a straight line, but the spots on the frets directly underneath it also go in a straight line (Many argue for or against neck relief, which is a slight front-bow in the neck and hence the fret line, but we will ignore that for now in this section). Moving from lower frets to higher ones, there is a steadily increasing amount of distance between the fret and string (string action).

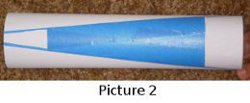
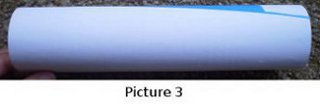
Now, imagine a standard fretboard with a constant curvature. Most websites refer to guitars having a fretboard radius of 15" or whatever, meaning that the curve of the fretboard follows a section of a circle with a radius of 15". Picture 2 show a fretboard (represented by blue tape) that has a very dramatic string taper and a very dramatic curve to better show the effect they have when combined, but the concept still applies. As you can see, the fretboard is like a section of a cylinder. To see why this isn't ideal, let's focus on the edge of the fretboard, where an outer string would be. Instead of running straight down the length of the cylinder, the edge of the blue tape goes slightly across it. If you view that edge from the side (picture 3), you can tell that the tape rises over the cylinder and goes back down on the other side (over the hump). Picture 4 shows how that looks using the diagram style from before (although it's exaggerated to illustrate the point). This is not ideal because the string height above the frets doesn't increase at a steady or constant rate like in picture 1. In real life it's not so blatant as in the picture but it does mean that for more heavily curved fretboards (or ones with more taper), this issue will be more present. That can lead to issues like fret buzz, poor sustain, and irregular distances to press the string down on different frets, which in turn leads to poor playability and poor intonation.
Bending a string in this case exacerbates the issue because when doing so, the string becomes stretched between two points further across the hump of the fretboard from each other, so it hits frets even more and the note is stifled faster. Note that this won't necessarily sounds like usual fret buzz, often it just quiets down unusually fast.

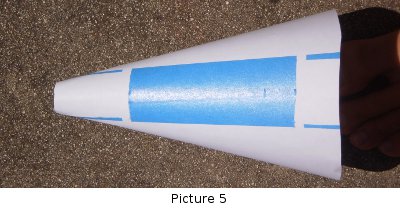
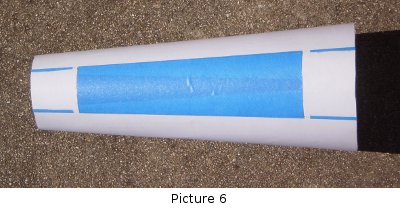
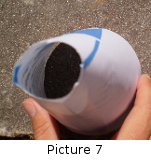
So, what to do? The best solution for these problems is to have a flat fretboard with no hump to get in the way, which means that whether you're playing an open note, a fretted note, or a heavily bent note, the sustain characterestics are all the same, which is to say not encumbered. If you want the comforts of curvature though, you could make the strings not tapered (so every one runs down the length of the cylinder) but that wouldn't be ergonomic, so instead you make the fingerboard into a section of a cone rather than a cylinder. You can see that the strings want to make a cone if you think about how the strings would taper to a point beyond the nut and spread infinitely beyond the bridge if you extended them out. Conical section fretboards can be done correctly, but rarely are, usually because the chosen cone shape has circular cross sections that change in radii too quickly (picture 5) when they should change more slowly (picture 6). People choose cones like picture 5 because it means that lower frets will be tightly curved, making it easier to fret chords, and it will be easier for fast playing and string bends on higher, flatter frets. That statement may be true, but if it's overdone it will still end up with problems.
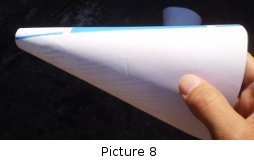
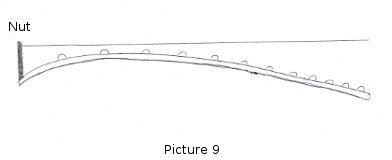
Pictures 7 and 8 show different views of the rapidly changing radii cone from picture 5. The edges of the blue tape (the fretboard) don't go straight down the cone in this case; rather, they move across it kind of like in picture 3. The difference here is the resulting path the frets take under the string curve in a different manner (picture 9), but that's still bad.
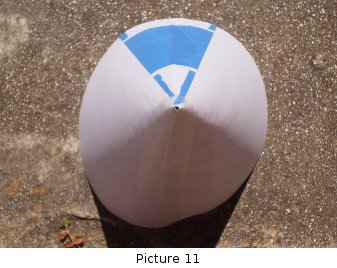
In order to make a good conical section fretboard, the amount of change between the first fret curvature and the final fret curvature needs to be proportional to the amount of string taper. If you wanted the curvature change of picture 5, you would need a string taper like in picture 10, because that amount of taper would make the edges of the fretboard go straight down the cone without moving across it (picture 11). That would yield frets like in the ideal case (picture 1), but the very large amount of string taper would just be weird and uncomfortable on an actual instrument.

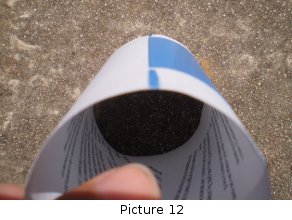
The ideal curved fretboard is represented by picture 6, where radius change and string taper are in accordance with each other. When this is the case, the fret spots under each string go straight down the cone (picture 12 and 13). As you can see back in picture 6, this means that the change in radius isn't very huge, but the way the frets look from the side is ideal like in picture 1.
If you would like a curved fretboard, I make them using that concept. You can tell me whatever amount of string taper you want (basically how wide you want your bridge and nut, and the scale length), how curved you want any single fret to be, then I do some math from there to determine how the cone's radius should change down the length of it.

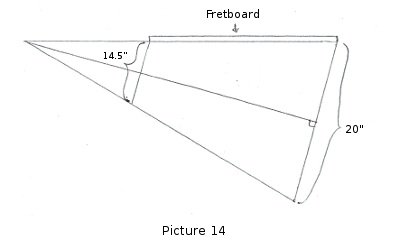
That's the main deal with my fretboards, but here are some other interesting things to note. Using Orb Weaver as an example, I list the fretboard radii as approximately 14.5" at the zero-fret and 20" at the 24th, but that is a tad misleading. I used the term radii because in a sense that is true; those are the radii extending from the cone's long axis to the cone surface/fretboard at those frets (picture 14). It is misleading because the frets aren't in the same plane as the radial cross-sections. Picture 15 shows how if you sort of extend the frets so they wrap all the way around the cone (dotted lines), they originate at one spot along the length of the cone and end up being further down the cone when it wraps around. This means that the frets end up being more elliptical in nature rather than being a section of a circle. It also means that the frets are a little flatter than you would think (e.g. the 24th fret is in the area of the cone that has a 20" radius, but the fret itself is a little flatter than it would be if it were a section of that 20" circle).
Here are the pros and cons of each fretboard type, and decisions should be made based off of these criteria and not off of comparing to other guitars. The majority of fretboards available are constant radius boards, but that is likely due to simplicity of manufacturing, and certainly not due to superior performance.
Flat Fretboard: If you want the longest sustain a fretboard can afford across all situations (simple fretted notes and string bends of any magnitude), a flat fretboard is without a doubt the best choice. The only possible con is that some people don't find them comfortable, although many love them and find no hindrance to comfort, myself included.
Conical Section Fretboard: If you really want a curved board, then a conical/compound radius fretboard that matches the strings' taper is the best way to go because it performs as well as a flat fretboard when fretting a note normally and only hinders sustain when doing bends.
Constant Radius Fretboard: These are the worst choice of the three, which is funny since that's what most manufacturers do. They impede on sustain at all points to some degree, unless it's a middle string that doesn't go across any hump or you bend a string to be in line like that. The only possible pro I can think of for a constant radius board is that if you tried to 100% accurately reproduce an existing instrument's sustain characteristics and it had a constant radius board, then you might want to match it. But this is a custom lutherie service service, and here we are generally interested in imaginative, informed creation without the constraints of convention.